For this activity you are going to experiment with identifying soil types. Once you know what soil you're working with in your yard or garden you can improve it if necessary and choose appropriate plants.
Lesson Plan
Earth-observing satellites like the Joint Polar Satellite System (JPSS) help scientists measure land surface temperature, soil moisture, and precipitation daily – important data for farmers and home gardeners!
Did you know that it can take 100 years to create an inch of topsoil? Soil is a complex combination of minerals, organic matter, water, and air. Soil is an interface between Earth systems which means it forms between where the geologic (rocks and minerals) and biologic (living organisms) parts of the Earth meet. It is very sensitive to changes in the environment like rainfall amounts, vegetation, air temperature and pollution. Your yard can have a different soil type than your neighbor’s yard depending on the plants you have, the amount of shade, the types of rock present, the slope of your yard and many other small differences. Well-developed soil with clearly identifiable layers, called soil horizons, indicate that the environment in a location has been stable for a long time. This allows the soil to form without being washed away by rain or disturbed by digging.
Soil Type
Soil is an important component of life that many of us take for granted. Without healthy soil we can’t grow healthy food. Plants need thick, fluffy, nutrient rich soil to thrive. Farmers and gardeners can learn about their soil so they can add compost, minerals, fertilizers, and water to grow healthier plants.
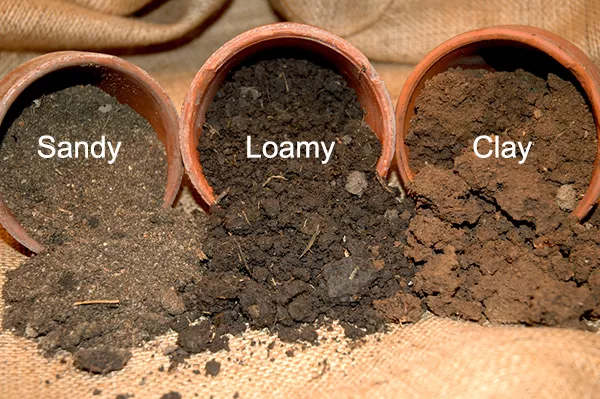
Loamy soil is a type of soil that has coarse sand, tiny silt particles, and clay in equal amounts. This is a great soil for gardens because it allows plants to grow roots easily and provides good drainage without drying out. It’s also easier to dig in! Most plants, except for desert plants like cactuses and succulents, like loamy soil.
Clay soil is sticky and hard to dig in. Clay is made of very small sediment that packs together tightly. This makes it more difficult for a plant’s delicate roots to penetrate and hard for water to sink in. Daylilies, asters, butterfly bushes, broccoli, and cabbages like clay soil.
Sandy soil is gritty and light colored because it lacks humus, the dark colored organic material in soil that delivers nutrients to plants. It is made of tiny pieces of rock and sand and allows water to drain easily. Irises, lavender, rosemary, and succulents prefer sandy soil.
Soil pH
The pH scale is a logarithmic scale that ranges from 0 – 14 with acids at the bottom (0) and alkaline values at the top (14.) Pure water, at a pH of 7, is considered to be neutral. Most soils have a pH between 3.5 and 10.
A soil’s pH is the measure of how acidic or alkaline it is. This is another important factor that contributes to plant health. Most plants prefer a neutral soil, but some plants prefer acidic soil, and some plants tolerate a more alkaline soil.
Alkaline Soil has a pH over 7.5. Sulfur and ammonia fertilizers can be added to soil to make it more acidic.
Acidic Soil has a pH between 5.5 and 6.5 but some soils can be strongly acidic. Lime or dolomite fertilizers can be added to soil to make it less acidic. Tomatoes, peppers, potatoes, squash, and roses do best in mildly acidic soil.
Testing soil samples yourself
You will need
- A clean empty jar with a tight lid
- A small shovel or trowel
- A sample of soil, about 1.5 cups of soil
- Access to water
- Vinegar
- Baking soda
- Paper cups or containers you can temporarily put soil in (check your recycling!)
Soil Testing
Part 1
- Go outside and collect a sample of soil. Make some predictions about your soil type and pH based on where you found it. Look around the area and think about what might contribute to soil formation and erosion. Can you see anything in the area that might cause soil pollution? (Fertilizers, roads/cars, sewage pipes, or anything else.)
- Pick through your sample and examine it for plant and mineral material. Is it dark colored, indicating that it has a lot of organic material, or light colored and more mineral based?
- Divide your soil sample in half and add half of it to your jar. Fill the rest of your jar with water and shake for two minutes. Let the jar sit without touching it and let the soil settle for the remainder of the experiment. We’ll come back to it in part 2.
- Take a handful of moist but not wet soil and squeeze it firmly in your hand. Then open your hand and observe what happens.
If it holds its shape but crumbles when you give it a light poke, it is loamy soil. This is the best soil for plants.
If it holds its shape and doesn't respond to being gently poked, then it is clay soil, which is nutrient rich but dense.
If it falls apart as soon as you open your hand, it is sandy soil.
- Scoop a small amount of your soil into a container. Add a small splash of vinegar. If the soil bubbles or fizzes, it is alkaline. Hold the soil up to your ear and listen for a crackling noise to make sure.
If there's no reaction, scoop up some more soil into a second container. Fill the cup the rest of the way with water and stir. Then add a pinch of baking soda. If the soil bubbles or fizzes, it's acidic. Hold the soil up to your ear and listen for a crackling sound.
Part 2
-
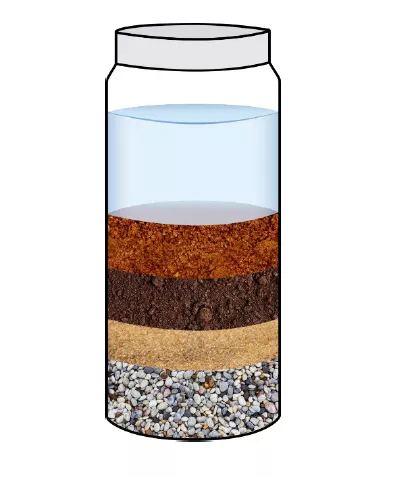
Once the sample has settled and the water in the top of the jar is mostly clear, you can read the results of your soil test.
Organic matter may be sitting on top or still be floating on the surface of the water.Above that are the tiny clay particles.
The next layer will be the small silt particles.
The bottom layer will be the heavier
particles, sand, and rocks.
2. Look at your soil and estimate the amount of material in each layer. (Don’t include the amount of water in your percentages. If this is difficult, let your sample sit undisturbed for longer until all of the particles settle.) Record your estimations.
| Material Type | Percentage |
|---|---|
| Clay | |
| Silt | |
| Sand |
3. Read your jar test and circle your results:
| % Clay | % Silt | % Sand | Type of Soil |
|---|---|---|---|
| 20% | 40% | 40% | Loamy soil |
| 30% | 60% | 10% | Silty Clay Loam |
| 15% | 20% | 65% | Sandy Loam |
| 15% | 65% | 20% | Silty Loam |
4. Based on the results of your experiments and your observations, what kind of soil do you have? What kind of plants will grow well in this soil?